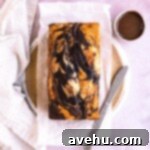
Easy & Moist Marble Loaf Cake: The Ultimate Vanilla Chocolate Swirl Recipe
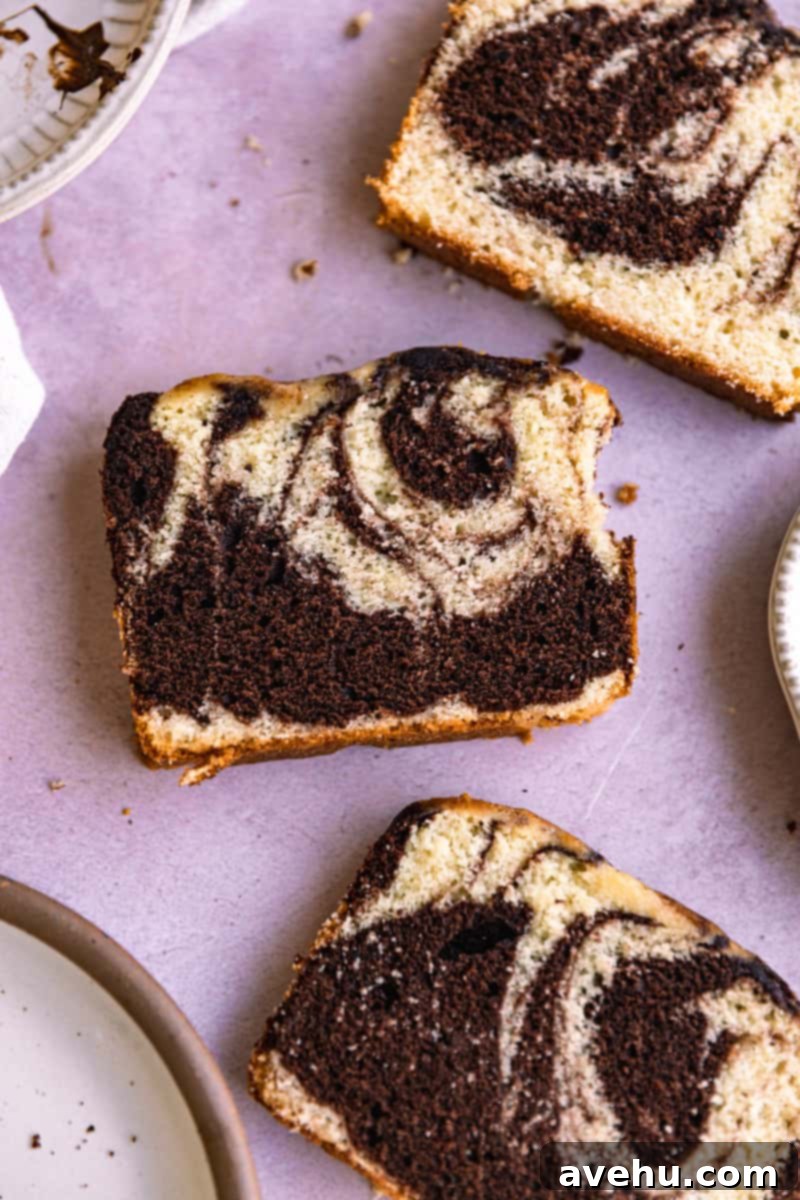
Discover the pure joy of baking a homemade marble loaf cake that boasts a stunning swirl of rich vanilla and decadent chocolate flavors. The best part? You only need to prepare *one* versatile batter, making this recipe incredibly straightforward and perfect for bakers of all skill levels. This loaf cake is wonderfully moist, incredibly fluffy, and can be elegantly topped with a silky chocolate frosting, a dusting of powdered sugar, or simply enjoyed in its unfrosted, rustic glory. It’s truly a delight in every slice!
There’s nothing quite as satisfying as creating a magnificent homemade marble loaf cake right in your own kitchen that rivals those from your favorite artisan bakeries. With this foolproof single-batter method and easy-to-follow techniques, you can achieve this iconic swirled dessert without any stress or fuss. This recipe is particularly excellent for beginner bakers looking to impress without complication, delivering a truly bakery-quality result every time.
The marble cake is a beloved classic dessert, celebrated for its distinctive patterns that beautifully mimic natural marble stone. These mesmerizing patterns are created when light and dark batters are gently swirled together before baking. Our special marble loaf cake variation simplifies the traditional process by utilizing a single base batter, which is then divided and flavored. This innovative approach makes it significantly easier to prepare than many conventional marble cake recipes, yet it still yields an exceptionally moist, flavorful, and visually striking marble loaf. It’s a perfect treat for any gathering, a delightful breakfast companion, or a comforting everyday indulgence.
Even with my formal training in baking and pastry arts, perfecting that elusive, elegant swirl in a marble loaf cake took some dedicated practice. Now, I am thrilled to share my refined techniques with you, ensuring you can achieve that beautiful, signature marble effect effortlessly! This vanilla chocolate swirl loaf is not only a fun baking project for yourself but also a fantastic dessert to prepare for your family or to bring to any party, where it is guaranteed to be a showstopper. No one needs to know just how incredibly simple it was to make! For an extra touch of indulgence, consider topping this cake with my small batch chocolate buttercream or even a rich brownie frosting. Both complement the flavors perfectly, enhancing the overall experience.
If you’re utterly charmed by the delightful combination of vanilla and chocolate and eager to explore more marbled sweet treats, I invite you to try some of my other popular recipes. You’ll love my Marble Cupcakes for perfectly portioned delights, the grand Marble Bundt Cake for a show-stopping dessert, or even these indulgent Cream Cheese Brownies that feature their own delectable marble swirl. Each recipe captures the essence of classic marble baking with unique twists!
For those special occasions where you want to truly impress, consider elevating your baking with a stunning layered marble cake. It offers a more dramatic presentation while still delivering that beloved vanilla and chocolate flavor combination.
Why This Marble Loaf Cake Recipe Is a Must-Try
This particular marble loaf cake recipe stands out for several compelling reasons, making it an absolute favorite among home bakers. It’s designed to deliver maximum flavor and visual appeal with minimal effort, ensuring a satisfying baking experience and a delicious result every time.
- Effortless Single-Batter Method: Unlike traditional marble cakes that often require preparing two separate batters, this recipe cleverly uses just one base batter. You simply divide it and flavor one portion with cocoa, significantly cutting down on prep time and dishes. This makes it surprisingly easy and requires minimal effort, ideal for busy schedules or beginner bakers.
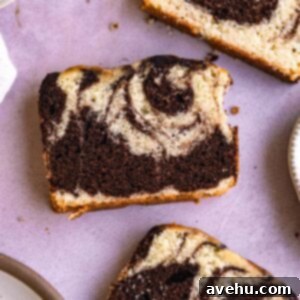
- Visually Stunning Marble Pattern: The signature marble pattern is not just delicious but also incredibly beautiful and impressive. The swirl of light vanilla and dark chocolate batter creates a unique, artful design in every slice, transforming a simple loaf cake into an elegant dessert. It’s a delightful twist on traditional cakes that always garners compliments.
- Incredibly Moist & Flavorful: This vanilla chocolate swirl loaf cake is crafted to be exceptionally moist, tender, and bursting with flavor. The combination of ingredients, including both butter and vegetable oil, along with buttermilk, ensures a rich crumb that stays fresh longer. Each bite offers a harmonious balance of sweet vanilla and deep chocolate, a truly delicious experience.
- Perfect for Any Occasion: Whether you need a quick breakfast treat, an afternoon snack, a comforting dessert, or something special to share at a potluck or party, this marble loaf cake fits the bill. Its universal appeal makes it a versatile choice for any event or simply for enjoying a quiet moment with a cup of coffee or tea.
Essential Ingredients for Your Perfect Marble Loaf Cake
Crafting this delightful marble loaf cake requires a selection of common pantry staples, each playing a crucial role in achieving its signature moist crumb and balanced flavor. Pay attention to the quality and temperature of your ingredients for the best results.
- Butter & Vegetable Oil: The strategic combination of both room temperature butter and vegetable oil is key to the loaf cake’s incredible texture. Butter contributes rich flavor and a tender crumb, while vegetable oil ensures exceptional moisture that lasts, preventing the cake from drying out. Ensure your butter is at room temperature for proper creaming; if you forgot to take it out in advance, learn how to quickly soften butter.
- White Granulated Sugar: Beyond simply adding sweetness, granulated sugar contributes to the cake’s moistness by attracting and retaining water, and helps with browning for a beautiful golden crust.
- Eggs: Large eggs serve multiple purposes in this recipe. They emulsify the batter, adding richness and contributing to a fine, moist texture. Eggs also act as a leavening agent when beaten, helping the cake to rise and set beautifully during baking. Always use room temperature eggs for better incorporation into the batter.
- All-Purpose Flour: This forms the structural backbone of our vanilla chocolate swirl loaf cake. Using all-purpose flour provides the necessary gluten development to give the cake its classic loaf shape and tender stability.
- Baking Powder & Baking Soda: These are our chemical leavening agents. Baking powder provides the primary lift, while baking soda reacts with the acidic buttermilk to give the loaf cake a perfect rise, ensuring it is light and fluffy yet retains a satisfyingly rich and dense crumb.
- Kosher Salt: A pinch of kosher salt is crucial for enhancing all the other flavors in the loaf cake. It balances out the sweetness, making the vanilla and chocolate notes truly shine and preventing the cake from tasting bland.
- Vanilla Extract: This essential ingredient provides the delicious, aromatic background flavor that defines the vanilla portion of our marble loaf cake and complements the chocolate beautifully. Use a good quality pure vanilla extract for the best taste.
- Unsweetened Cocoa Powder: This is what gives the chocolate batter its rich color and deep flavor, creating the classic marble effect. For a more dramatic and visually striking chocolate swirl, I highly recommend using Hershey’s Special Dark cocoa powder. Its darker hue makes the contrast with the vanilla batter truly stand out.
- Buttermilk: Unlike regular milk, buttermilk is an acidic ingredient that reacts with the baking soda to create a tender, moist crumb. It also imparts a subtle tanginess that adds depth and complexity to the loaf cake’s flavor profile, making it incredibly tender and luscious.
- Chocolate Frosting (Optional): While this easy marble loaf cake is delicious on its own, a touch of frosting can elevate it further. You can top it with this brownie frosting for an extra rich chocolatey kick or opt for a lighter yet equally delightful small batch chocolate buttercream.
You’ll also need a standard size loaf pan. A standard size typically measures around 9″ x 5″, similar to this recommended loaf pan, to ensure proper baking and loaf shape.
How to Make Your Delicious Marble Loaf Cake: Step-by-Step Guide
Baking this moist marble loaf cake is a rewarding process, made simple with these clear, detailed steps. Follow along to achieve a beautifully swirled, flavorful cake every time.
Step 1: Prepare for Baking – Begin by preheating your oven to 350°F (175°C). Next, take a standard 9×5-inch loaf pan and generously spray it with baking spray, ensuring every corner is coated. This crucial step prevents sticking and ensures your beautiful loaf releases easily. Set the prepared pan aside.
Step 2: Cream Butter and Sugar – In the bowl of a stand mixer fitted with the paddle attachment (or using a hand mixer), add the room temperature butter and granulated sugar. Mix on low speed initially, then increase to medium, creaming until the mixture is light, fluffy, and pale in color, about 2-3 minutes. This incorporates air, which is vital for a tender cake. Gradually add the vegetable oil and then the eggs, one at a time, mixing thoroughly after each addition until fully incorporated. Scrape down the sides of the bowl as needed to ensure everything is well combined.
Step 3: Combine Dry Ingredients – In a separate medium-sized bowl, whisk together the all-purpose flour, baking powder, baking soda, and kosher salt. Whisking ensures these dry ingredients are evenly distributed, which is important for uniform rising.
Step 4: Combine Wet Ingredients (Separate) – In another smaller mixing bowl or a liquid measuring cup, whisk together the buttermilk and vanilla extract. This ensures the liquids are ready to be incorporated smoothly into the batter.
Step 5: Mix Wet and Dry Ingredients – Now, it’s time to bring it all together. With the mixer on low speed, gradually add the dry ingredients to the wet butter-sugar-egg mixture, alternating with the buttermilk and vanilla mixture. Begin and end with the dry ingredients. Mix only until the batter is *just* combined and no streaks of flour remain. Overmixing can lead to a tough cake, so be gentle.
Step 6: Create the Chocolate Batter – Carefully remove about 3/4 cup of the prepared vanilla batter and place it into a separate small bowl. To this portion, whisk in the unsweetened cocoa powder and the remaining 1 tablespoon of buttermilk. Mix until the cocoa powder is fully incorporated and you have a smooth, rich chocolate batter.
Step 7: Assemble the Marble Loaf – Pour a thin, even layer of the vanilla batter into the bottom of your prepared loaf pan. This creates a good base. Then, using an ice cream scoop or a large spoon, alternate dollops of the vanilla and chocolate batters over the base layer. Continue layering the batters in scoops until all of it is in the pan. Don’t worry about perfection here; the randomness contributes to the beautiful marble effect.
Step 8: Swirl the Batter – Once all the batter is in the pan, take a skewer, a butter knife, or even a chopstick. Gently insert it into the batter and move it in a swirling or figure-eight motion through the layers. Be careful not to over-swirl the batter, as this will cause the colors to blend completely, and you’ll lose the distinct marble pattern. A few gentle passes are all you need to create those lovely veins of color.
Step 9: Bake the Loaf Cake – Place the loaf pan into your preheated oven. Bake for approximately 50-55 minutes. The marble loaf cake is fully baked when a wooden skewer or toothpick inserted into the very center comes out with only a few moist crumbs attached, but no wet batter. If it’s browning too quickly on top, you can loosely tent it with foil. Once baked, remove from the oven and let it cool in the pan on a wire rack for about 10-15 minutes before carefully inverting it onto the rack to cool completely. Cooling thoroughly is essential before frosting or slicing.
Garnishing and Serving Your Marble Loaf Cake
This homemade marble loaf cake is truly delicious on its own, showcasing the perfect blend of vanilla and chocolate. However, a simple garnish can elevate its presentation and add another layer of flavor. You can effortlessly enhance its appeal by sprinkling a delicate dusting of confectioners’ sugar over the top for a classic, understated elegance. Alternatively, for a more indulgent experience, consider topping it with a rich and creamy small batch chocolate buttercream, which perfectly complements the cake’s flavors.
Expert Tips for Marble Loaf Cake Success
Achieving a perfectly moist and beautifully swirled vanilla chocolate loaf cake is easier with these expert tips:
- Layering the Batters for the Best Swirl: When you’re adding the batters to the loaf pan, alternate dollops of vanilla and chocolate on top of each other. Don’t strive for perfect symmetry; the beauty of marble cake lies in its organic, artistic swirls. Random placement often yields the most natural and appealing patterns.
- Room Temperature Ingredients are Key: Always ensure your butter and eggs are at room temperature before you begin mixing. Room temperature ingredients emulsify more effectively, creating a smoother, more uniform batter. This leads to a finer crumb texture and a more consistent rise in your finished cake.
- Gentle Swirling for Defined Patterns: This is perhaps the most crucial step for the marble effect. When you’re swirling the batters with a skewer or knife, do so gently and sparingly. Overmixing the batter at this stage will cause the vanilla and chocolate to blend completely, resulting in a muddy, light brown cake rather than distinct marble patterns. Aim for only 2-3 gentle swirls.
- Cool Completely Before Topping: Patience is a virtue in baking! Allow your marble loaf cake to cool completely on a wire rack before applying any frosting, glaze, or even a simple chocolate drizzle. A warm cake will melt any topping you place on it, leading to a messy and unappetizing result.
- Choose Your Cocoa Wisely for Visual Impact: For the most striking visual contrast between the vanilla and chocolate swirls, I highly recommend using a dark cocoa powder, such as Hershey’s Special Dark cocoa powder. Its deep color will make the chocolate portion truly pop against the lighter vanilla, enhancing the beautiful marble effect.
Storage and Freezing Instructions for Your Marble Loaf Cake
To keep your delicious homemade marble loaf cake fresh and enjoyable for as long as possible, proper storage is essential. Here’s how to best store your baked masterpiece:
Storing at Room Temperature: Once your marble loaf cake has completely cooled and, if desired, has been frosted, store it in an airtight container. This will keep it fresh and moist on your kitchen counter for up to 3 days. Ensure it’s away from direct sunlight or heat sources.
Refrigeration: For extended freshness, especially if your cake contains dairy-based frosting or if your kitchen is warm, you can store the loaf cake in an airtight container in the refrigerator for up to 5 days. Be aware, however, that the cold air in a refrigerator can sometimes cause cakes to dry out a bit faster. To combat this, you can place a slice of bread or a paper towel dampened with water in the container, away from direct contact with the cake, to help maintain humidity.
Freezing for Long-Term Enjoyment: You’ll be delighted to know that this moist marble loaf cake freezes beautifully for up to 3 months! To freeze, ensure the cake is completely cooled. If unfrosted, wrap the entire loaf tightly in several layers of plastic wrap, followed by a layer of aluminum foil. If frosted, you might want to freeze it uncovered first until the frosting is firm, then wrap it. Place the well-wrapped loaf in a freezer-safe bag or container to protect it from freezer burn. When you’re ready to enjoy it, simply thaw the cake on your kitchen counter at room temperature for several hours or overnight before serving. This method allows you to always have a delightful treat on hand!
Frequently Asked Questions About Marble Loaf Cake
Here are some common questions and helpful answers regarding this delightful vanilla chocolate swirl loaf cake:
Q: Is this marble loaf cake recipe genuinely difficult to make for a beginner?
A: Absolutely not! This easy marble loaf cake recipe is designed to be very approachable, even for novice bakers. By using a single batter and straightforward steps, we’ve simplified the process considerably. The most important keys to success are to avoid over-mixing the batter when creating the marble effect (to maintain distinct swirls) and to allow the cake to cool completely before adding any toppings or drizzles. Follow the instructions carefully, and you’ll achieve a beautiful and delicious result!
Q: Can I use a hand mixer instead of a stand mixer for this recipe?
A: Yes, certainly! A hand mixer can be used as an excellent alternative to a stand mixer for making this moist marble loaf cake. Just be mindful not to overwork the batter, especially after adding the flour. Overmixing can develop too much gluten, which might result in a slightly tougher or denser cake texture. Mix until just combined, stopping as soon as the dry ingredients are no longer visible.
Q: What other flavor variations or ingredient substitutions can I try with this loaf cake?
A: This recipe is wonderfully versatile! Besides using Hershey’s Special Dark cocoa powder for a dramatically dark chocolate marble pattern, you can experiment with other flavor extracts. Instead of vanilla extract, consider almond extract for a nutty twist, or orange extract for a bright, citrusy note that pairs surprisingly well with chocolate. For a subtle tropical hint and an alternative to vegetable oil, you can use melted and cooled coconut oil, which will impart a light coconut flavor and maintain moisture. You can also mix in chocolate chips into the batter for an extra layer of texture and chocolate intensity.
Q: My marble swirl didn’t look very distinct. What went wrong?
A: The most common reason for a less distinct marble swirl is over-swirling the batters. When you mix too much, the vanilla and chocolate batters blend completely, turning into a uniform light brown color rather than distinct patterns. Remember to use only 2-3 gentle passes with your skewer or knife to create the swirls, aiming for pockets of each color.
Q: My cake turned out dry. How can I prevent this next time?
A: A dry cake is usually a sign of overbaking or not using room temperature ingredients. Ensure you measure your flour accurately (using a kitchen scale is best, or spoon and level). Stick to the baking time specified, but always rely on the skewer test for doneness – remove the cake as soon as the skewer comes out with a few moist crumbs. Also, always use room temperature butter, eggs, and buttermilk, as they emulsify better, leading to a more tender and moist crumb. Using both butter and oil, as this recipe calls for, already helps tremendously with moisture retention.
Delightful Ways to Enjoy Your Marble Loaf Cake
This versatile vanilla chocolate swirl loaf cake offers countless possibilities for enjoyment, whether you prefer it simple or dressed up for a special treat:
- Classic Dessert with Ice Cream: For an ultimate dessert experience, enjoy a warm slice of this loaf cake with a generous scoop of creamy vanilla ice cream. The warmth of the cake melts the ice cream slightly, creating a heavenly combination.
- Enhanced with Caramel Sauce: Elevate the sweetness and add a sophisticated layer of flavor with a luscious drizzle of bourbon caramel sauce. The rich, buttery notes of the caramel beautifully complement both the vanilla and chocolate in the cake.
- Tangy Cream Cheese Frosting: For those who appreciate a delightful tangy contrast, top your marble loaf cake with a dollop or a full spread of cream cheese frosting. The slight tartness of the cream cheese cuts through the sweetness of the cake, creating an incredibly addictive treat.
- Perfect Breakfast or Brunch Item: Serve slices of this moist loaf cake alongside your morning coffee or tea. It’s hearty enough for a breakfast treat but still feels special.
- Packaged for Picnics or Lunchboxes: Its robust structure makes it ideal for packing. Slice it, wrap individual portions, and take them along for picnics, school lunches, or as a delightful snack on the go.
Light and Moist Marble Loaf Cake
10 minutes
55 minutes
1 hour
5 minutes
12
people
Pin
Review
Save
Saved!
Prevent your screen from going dark
Ingredients
-
½
cup
butter,
unsalted and room temp -
1
cup
granulated sugar -
2
tbsp
vegetable oil -
2
eggs,
large -
2
cups
all purpose flour -
½
tsp
baking powder -
¼
tsp
baking soda -
¼
tsp
kosher salt -
½
cup
buttermilk,
(+1 tbsp) divided -
1
tbsp
vanilla extract -
2
tbsp
cocoa powder
Chocolate drizzle (Optional)
Instructions
-
Preheat your oven to 350°F (175°C). Generously spray a standard 9″x5″ loaf pan with baking spray to prevent sticking.
-
 In the bowl of a hand or stand mixer fitted with the paddle attachment, cream together the ½ cup room temperature butter and 1 cup granulated sugar on low-medium speed for about 2 minutes until light and fluffy. Add the 2 tbsp vegetable oil and mix until just combined. Incorporate the 2 large eggs one at a time on medium speed, mixing well after each addition and scraping down the bowl as needed.
 -
In a separate medium bowl, whisk together the 2 cups all-purpose flour, ½ tsp baking powder, ¼ tsp baking soda, and ¼ tsp kosher salt. Mix lightly to combine all dry ingredients evenly.
-
In a measuring cup or small bowl, whisk together ½ cup buttermilk and 1 tbsp vanilla extract. Set this wet mixture aside.
-
 With the mixer on low speed, slowly alternate adding the dry ingredients (flour mixture) and the wet ingredients (buttermilk mixture) to the creamed butter-sugar-egg mixture. Begin and end with the dry ingredients, mixing just until the batter is combined and no dry streaks remain. Be careful not to overmix.
 -
 Scoop ¾ cup of the vanilla batter into a separate small bowl. To this, add 2 tbsp unsweetened cocoa powder and the remaining 1 tbsp buttermilk. Stir gently but thoroughly until a smooth, rich chocolate batter forms.
 -
 Spread a thin layer of the vanilla batter across the bottom of the prepared loaf pan. Then, using an ice cream scoop or a large spoon, alternate adding scoops of the vanilla and chocolate batters into the loaf pan until all the batter is used up, forming layers.
 -
 Using a skewer, butter knife, or chopstick, gently swirl the batters together in a figure-eight or zig-zag pattern. Be careful not to swirl too much, as this will cause the distinct batters to blend into one color, preventing the beautiful marble pattern from forming. A few gentle passes are sufficient.
 -
 Bake in the preheated oven for 50-55 minutes. The loaf cake is done when a skewer or toothpick inserted into the middle comes out with only a few moist crumbs attached. Allow to cool in the pan for 10-15 minutes before transferring to a wire rack to cool completely.
 -
Once completely cooled, optionally top with powdered sugar or a delightful small batch chocolate buttercream.
Notes
If you don’t have an ice cream scoop for layering the batters, a large spoon can be used effectively instead to dollop the mixtures into the pan.
Serving:
1
slice
,
Calories:
250
kcal
,
Carbohydrates:
34
g
,
Protein:
4
g
,
Fat:
11
g
,
Saturated Fat:
6
g
,
Polyunsaturated Fat:
2
g
,
Monounsaturated Fat:
3
g
,
Trans Fat:
0.3
g
,
Cholesterol:
49
mg
,
Sodium:
172
mg
,
Potassium:
63
mg
,
Fiber:
1
g
,
Sugar:
17
g
,
Vitamin A:
292
IU
,
Calcium:
32
mg
,
Iron:
1
mg
Breakfast, Cake, Dessert
Sam Adler
American
Did you make this recipe?
Please leave a star rating and review in the form below. I read them all!
